Grafičko sučelje igre
Html igrice su igrice napravljene pomoću HTML-a i JS.
Jedna od popularnijih je “downasaur” Chrome Dinosaur igrica koja se pojavi kada nemate interneta.
Kako bi započeli s pravljenjem igrice u HTML-u, potrebno je prvo napraviti prostor gdje će se igrica odvijati (<canvas>).
Primjer:
function startGame() {
myGameArea.start();
}
var myGameArea = {
canvas : document.createElement(“canvas”),
start : function() {
this.canvas.width = 480;
this.canvas.height = 270;
this.context = this.canvas.getContext(“2d”);
document.body.insertBefore(this.canvas, document.body.childNodes[0]);
}
}

Komponente igre
Objekt myGameArea imat će više svojstava i metoda kasnije.
Funkcija startGame () poziva metodu start () objekta myGameArea.
Metoda start () stvara element <canvas> i ubacuje ga kao prvu podređenu cjelinu elementa <body>.
Dodavanjem:
myGamePiece = new component(30, 30, “red”, 10, 120);

nacrtati će se kvadrat koji je crvene boje.
Prvo stvorite novu funkciju koja se naziva updateGameArea ().
U objekt myGameArea dodajte interval koji će pokretati funkciju updateGameArea () svake 20. milisekunde (50 puta u sekundi).
Također dodajte funkciju koja se naziva clear () koja briše cijelo platno.
U konstruktor komponente dodajte funkciju koja se naziva update () za rukovanje crtežom komponente.
Funkcija updateGameArea () poziva metodu clear () i update ().
Rezultat je da se komponenta crta i briše 50 puta u sekundi:


var redGamePiece, blueGamePiece, yellowGamePiece;
function startGame() {
redGamePiece = new component(75, 75, “red”, 10, 10);
yellowGamePiece = new component(75, 75, “yellow”, 50, 60);
blueGamePiece = new component(75, 75, “blue”, 10, 110);
myGameArea.start();
}
function updateGameArea() {
myGameArea.clear();
redGamePiece.update();
yellowGamePiece.update();
blueGamePiece.update();
blueGamePiece.x += 1;
redGamePiece.x += 1;
yellowGamePiece.x += 1;
myGamePiece.update();
}


Kontroler
<button onclick=”movedown()”>DOWN</button>
<button onclick=”moveleft()”>LEFT</button>
<button onclick=”moveright()”>RIGHT</button>
this.width = width;
this.height = height;
this.speedX = 0;
this.speedY = 0;
this.x = x;
this.y = y;
this.update = function() {
ctx = myGameArea.context;
ctx.fillStyle = color;
ctx.fillRect(this.x, this.y, this.width, this.height);
}
this.newPos = function() {
this.x += this.speedX;
this.y += this.speedY;
}
}function updateGameArea() {
myGameArea.clear();
myGamePiece.newPos();
myGamePiece.update();
}function moveup() {
myGamePiece.speedY -= 1;
}function movedown() {
myGamePiece.speedY += 1;
}function moveleft() {
myGamePiece.speedX -= 1;
}function moveright() {
myGamePiece.speedX += 1;
}

function stopMove() {
myGamePiece.speedX = 0;
myGamePiece.speedY = 0;
}
</script>
<button onmousedown=”moveup()” onmouseup=”stopMove()” ontouchstart=”moveup()“>UP</button>
<button onmousedown=”movedown()” onmouseup=”stopMove()” ontouchstart=”movedown()”>DOWN</button>
<button onmousedown=”moveleft()” onmouseup=”stopMove()” ontouchstart=”moveleft()”>LEFT</button>
<button onmousedown=”moveright()” onmouseup=”stopMove()” ontouchstart=”moveright()”>RIGHT</button>
Moguće je također kontrolirati oblik pomoću tipkovnice ili miša, no to ne ću prikazivati.
Kako bi dodali nešto zabavno kao smrt u igricu moramo doadti sljedeći dio koda:
var myGameArea = {
canvas : document.createElement(“canvas”),
start : function() {
this.canvas.width = 480;
this.canvas.height = 270;
this.context = this.canvas.getContext(“2d”);
document.body.insertBefore(this.canvas, document.body.childNodes[0]);
this.interval = setInterval(updateGameArea, 20);
},
clear : function() {
this.context.clearRect(0, 0, this.canvas.width, this.canvas.height);
},
stop : function() {
clearInterval(this.interval);
}
}
function component(width, height, color, x, y) {
this.width = width;
this.height = height;
this.speedX = 0;
this.speedY = 0;
this.x = x;
this.y = y;
this.update = function() {
ctx = myGameArea.context;
ctx.fillStyle = color;
ctx.fillRect(this.x, this.y, this.width, this.height);
}
this.newPos = function() {
this.x += this.speedX;
this.y += this.speedY;
}
this.crashWith = function(otherobj) {
var myleft = this.x;
var myright = this.x + (this.width);
var mytop = this.y;
var mybottom = this.y + (this.height);
var otherleft = otherobj.x;
var otherright = otherobj.x + (otherobj.width);
var othertop = otherobj.y;
var otherbottom = otherobj.y + (otherobj.height);
var crash = true;
if ((mybottom < othertop) ||
(mytop > otherbottom) ||
(myright < otherleft) ||
(myleft > otherright)) {
crash = false;
}
return crash;
}
}
function updateGameArea() {
if (myGamePiece.crashWith(myObstacle)) {
myGameArea.stop();
} else {
myGameArea.clear();
myObstacle.update();
myGamePiece.newPos();
myGamePiece.update();
}
}
Prepreke
Kako bi učinili igricu zabavnijom i naravno, da se nešto događa, moramo dodati prepreke.
A to radimo tako da dodamo novu komponentu myObstacle i onda dodjelimo boju i ažuriramo ju 50 puta u sekundi.
Primjer:
var myGamePiece;
var myObstacle;
function startGame() {
myGamePiece = new component(30, 30, “red”, 10, 120);
myObstacle = new component(10, 200, “green”, 300, 120);
myGameArea.start();
}
function updateGameArea() {
myGameArea.clear();
myObstacle.update();
myGamePiece.newPos();
myGamePiece.update();
}
Naravno kako bi igrica imala smisla napraviti ćemo da se zavrsi ukoliko ih dotaknemo.
var myGameArea = {
canvas : document.createElement(“canvas”),
start : function() {
this.canvas.width = 480;
this.canvas.height = 270;
this.context = this.canvas.getContext(“2d”);
document.body.insertBefore(this.canvas, document.body.childNodes[0]);
this.interval = setInterval(updateGameArea, 20);
},
clear : function() {
this.context.clearRect(0, 0, this.canvas.width, this.canvas.height);
},
stop : function() {
clearInterval(this.interval);
}
}
function component(width, height, color, x, y) {
this.width = width;
this.height = height;
this.speedX = 0;
this.speedY = 0;
this.x = x;
this.y = y;
this.update = function() {
ctx = myGameArea.context;
ctx.fillStyle = color;
ctx.fillRect(this.x, this.y, this.width, this.height);
}
this.newPos = function() {
this.x += this.speedX;
this.y += this.speedY;
}
this.crashWith = function(otherobj) {
var myleft = this.x;
var myright = this.x + (this.width);
var mytop = this.y;
var mybottom = this.y + (this.height);
var otherleft = otherobj.x;
var otherright = otherobj.x + (otherobj.width);
var othertop = otherobj.y;
var otherbottom = otherobj.y + (otherobj.height);
var crash = true;
if ((mybottom < othertop) ||
(mytop > otherbottom) ||
(myright < otherleft) ||
(myleft > otherright)) {
crash = false;
}
return crash;
}
}
function updateGameArea() {
if (myGamePiece.crashWith(myObstacle)) {
myGameArea.stop();
} else {
myGameArea.clear();
myObstacle.update();
myGamePiece.newPos();
myGamePiece.update();
}
}

Praćenje rezultata
Kako bi pratili rezultat u našoj igrici mi ćemo brojati koliko je sličica prošlo sve dok ne umremo. Kada umremo, tada ćemo pokazati koliko se ukupno sličica prikazalo prije nego što smo umrli.
Prvo dodajemo sljedeći kod:
var myGamePiece;
var myObstacles = [];
var myScore;
function startGame() {
myGamePiece = new component(30, 30, “red”, 10, 160);
myScore = new component(“30px”, “Consolas”, “black”, 280, 40, “text”);
myGameArea.start();
}
Nakon toga moramo pozvati funkciju.
function component(width, height, color, x, y, type) {
this.type = type;
this.width = width;
this.height = height;
this.speedX = 0;
this.speedY = 0;
this.x = x;
this.y = y;
this.update = function() {
ctx = myGameArea.context;
if (this.type == “text”) {
ctx.font = this.width + ” “ + this.height;
ctx.fillStyle = color;
ctx.fillText(this.text, this.x, this.y);
} else {
ctx.fillStyle = color;
ctx.fillRect(this.x, this.y, this.width, this.height);
}
}
}
Nakon toga trebamo dodati sljedeći kod koji ce brojati sličice.
function updateGameArea() {
var x, height, gap, minHeight, maxHeight, minGap, maxGap;
for (i = 0; i < myObstacles.length; i += 1) {
if (myGamePiece.crashWith(myObstacles[i])) {
myGameArea.stop();
return;
}
}
myGameArea.clear();
myGameArea.frameNo += 1;
if (myGameArea.frameNo == 1 || everyinterval(150)) {
x = myGameArea.canvas.width;
minHeight = 20;
maxHeight = 200;
height = Math.floor(Math.random()*(maxHeight-minHeight+1)+minHeight);
minGap = 50;
maxGap = 200;
gap = Math.floor(Math.random()*(maxGap-minGap+1)+minGap);
myObstacles.push(new component(10, height, “green”, x, 0));
myObstacles.push(new component(10, x – height – gap, “green”, x, height + gap));
}
for (i = 0; i < myObstacles.length; i += 1) {
myObstacles[i].speedX = –1;
myObstacles[i].newPos();
myObstacles[i].update();
}
myScore.text = “SCORE: “ + myGameArea.frameNo;
myScore.update();
myGamePiece.newPos();
myGamePiece.update();
}

Ugradnja slike u igru
U našoj igri za izradu igračkog komada kao slike koristite konstruktor komponenata, ali umjesto pozivanja na boju, morate se pozvati na url slike. I morate reći konstruktoru da je ova komponenta tipa “image”:
function startGame() {
myGamePiece = new component(30, 30, “smiley.gif”, 10, 120, “image”);
myGameArea.start();
}
U konstruktoru komponenata testiramo je li komponenta tipa “image” i kreiramo objekt slike pomoću ugrađenog konstruktora objekta “new Image ()”. Kada smo spremni za crtanje slike, koristimo metodu drawImage umjesto metode fillRect:
function component(width, height, color, x, y, type) {
this.type = type;
if (type == “image”) {
this.image = new Image();
this.image.src = color;
}
this.width = width;
this.height = height;
this.speedX = 0;
this.speedY = 0;
this.x = x;
this.y = y;
this.update = function() {
ctx = myGameArea.context;
if (type == “image”) {
ctx.drawImage(this.image,
this.x,
this.y,
this.width, this.height);
} else {
ctx.fillStyle = color;
ctx.fillRect(this.x, this.y, this.width, this.height);
}
}
}

Dodavanje zvuka
Upotrijebite element HTML5 <audio> za dodavanje zvuka i glazbe u svoje igre.
U našim primjerima kreiramo novi konstruktor objekata za obradu zvučnih objekata:
function sound(src) {
this.sound = document.createElement(“audio”);
this.sound.src = src;
this.sound.setAttribute(“preload”, “auto”);
this.sound.setAttribute(“controls”, “none”);
this.sound.style.display = “none”;
document.body.appendChild(this.sound);
this.play = function(){
this.sound.play();
}
this.stop = function(){
this.sound.pause();
}
}
Kako bi reproducirali zvuk kada naš igrač dotakne prepreku trebamo napraviti sljedeće:
var myGamePiece;
var myObstacles = [];
var mySound;
function startGame() {
myGamePiece = new component(30, 30, “red”, 10, 120);
mySound = new sound(“bounce.mp3”);
myGameArea.start();
}
function updateGameArea() {
var x, height, gap, minHeight, maxHeight, minGap, maxGap;
for (i = 0; i < myObstacles.length; i += 1) {
if (myGamePiece.crashWith(myObstacles[i])) {
mySound.play();
myGameArea.stop();
return;
}
}
}
Dodavanje utjecaja gravitacije
Kako bi dodali jednostavnu gravitaciju koja utječe na tijela u igrici potrebno je napraviti:
function component(width, height, color, x, y, type) {
this.type = type;
this.width = width;
this.height = height;
this.x = x;
this.y = y;
this.speedX = 0;
this.speedY = 0;
this.gravity = 0.05;
this.gravitySpeed = 0;
this.update = function() {
ctx = myGameArea.context;
ctx.fillStyle = color;
ctx.fillRect(this.x, this.y, this.width, this.height);
}
this.newPos = function() {
this.gravitySpeed += this.gravity;
this.x += this.speedX;
this.y += this.speedY + this.gravitySpeed;
}
}
Dodavanje odbijanja o prepreku
Kako bi napravili da se odbija o prepreku potrebno je dodati “bounce” svojstvo.
Vrijednost odbijenog svojstva mora biti broj. 0 uopće nema odskoka, a 1 će odbaciti komponentu sve do mjesta na kojem počinje padati.
this.type = type;
this.width = width;
this.height = height;
this.x = x;
this.y = y;
this.speedX = 0;
this.speedY = 0;
this.gravity = 0.1;
this.gravitySpeed = 0;
this.bounce = 0.6;
this.update = function() {
ctx = myGameArea.context;
ctx.fillStyle = color;
ctx.fillRect(this.x, this.y, this.width, this.height);
}
this.newPos = function() {
this.gravitySpeed += this.gravity;
this.x += this.speedX;
this.y += this.speedY + this.gravitySpeed;
this.hitBottom();
}
this.hitBottom = function() {
var rockbottom = this.gamearea.canvas.height – this.height;
if (this.y > rockbottom) {
this.y = rockbottom;
this.gravitySpeed = -(this.gravitySpeed * this.bounce);
}
}
}
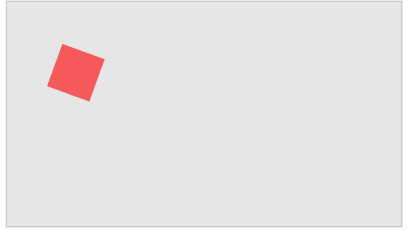
Rotacija elemenata
Ranije u ovom vodiču, crveni se kvadrat mogao kretati po igraonici, ali se nije mogao okretati ili rotirati.
Da bismo rotirali komponente, moramo promijeniti način na koji crtamo komponente.
Jedina metoda rotacije dostupna za element platna rotirat će cijelo platno:
Sve ostalo što nacrtate na platnu također će se rotirati, a ne samo određena komponenta.
Zbog toga moramo izvršiti neke promjene u metodi update ():
Prvo spremamo trenutni objekt konteksta platna:
ctx.save ();
Zatim pomičemo cijelo platno u središte određene komponente, koristeći metodu prevođenja:
ctx.translate (x, y);
Zatim izvodimo željenu rotaciju metodom rotate ():
ctx.rotate (kut);
Sada smo spremni nacrtati komponentu na platno, ali sada ćemo je nacrtati s središnjim položajem na položaju 0,0 na prevedenom (i rotiranom) platnu:
ctx.fillRect (širina / -2, visina / -2, širina, visina);
Kada završimo, moramo vratiti objekt konteksta natrag u njegov spremljeni položaj, koristeći metodu vraćanja:
ctx.restore ();
Komponenta je jedina stvar koja se rotira:
Pomicanje objekata
Također napravite neke promjene u metodi newPos () kako biste izračunali položaj komponente na temelju brzine i kuta.
Prema zadanim postavkama, komponente su okrenute prema gore, a postavljanjem svojstva brzine na 1, komponenta će se početi pomicati naprijed.
function component(width, height, color, x, y) {
this.gamearea = gamearea;
this.width = width;
this.height = height;
this.angle = 0;
this.speed = 1;
this.x = x;
this.y = y;
this.update = function() {
ctx = myGameArea.context;
ctx.save();
ctx.translate(this.x, this.y);
ctx.rotate(this.angle);
ctx.fillStyle = color;
ctx.fillRect(this.width / –2, this.height / –2, this.width, this.height);
ctx.restore();
}
this.newPos = function() {
this.x += this.speed * Math.sin(this.angle);
this.y -= this.speed * Math.cos(this.angle);
}
}
Evo sada znate kako napraviti jednostavnu HTML igricu te možete naparviti Vašu osobnu igricu i pokazati ju svijetu!